BLEスキャンの実装|Android開発
AndroidアプリでBLE(Bluetooth Low Energy)をスキャンする方法です。
事前準備
import
import android.bluetooth.*;
import android.bluetooth.le.*;
BluetoothAdapter の取得
ActivityであればonCreate()などで行います。
private BluetoothAdapter mBluetoothAdapter;

final BluetoothManager bluetoothManager = (BluetoothManager) getSystemService(Context.BLUETOOTH_SERVICE);
mBluetoothAdapter = bluetoothManager.getAdapter();
if (mBluetoothAdapter == null) {
    // Bluetooth 利用不可の端末.
}
以前の「Bluetooth通信の実装記事」では
BluetoothAdapterの取得にBluetoothAdapter.getDefaultAdapter()を記載しましたが、BluetoothAdapter.getDefaultAdapter()はAPI level 31でdeprecatedになりました。
Bluetooth の有効確認
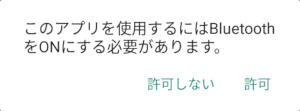
mBluetoothAdapter.isEnabled()でBluetoothが有効かどうかを判定します。下記サンプルではBluetoothが無効の場合にBlutoothの有効化を要求するダイアログを表示しています。
private static final int REQUEST_ENABLE_BT = 1;

if (!mBluetoothAdapter.isEnabled()) {
    // Bluetooth 有効要求.
    Intent enableBtIntent = new Intent(BluetoothAdapter.ACTION_REQUEST_ENABLE);
    startActivityForResult(enableBtIntent, REQUEST_ENABLE_BT);
    return;
}
Bluetooth の有効要求ダイアログ

BLEスキャン
BLEスキャンの開始
BluetoothLeScanner.startScan()でスキャンを開始します。
final BluetoothLeScanner bluetoothLeScanner = mBluetoothAdapter.getBluetoothLeScanner();
bluetoothLeScanner.startScan(mLeScanCallback);
ScanCallback
スキャン結果はコールバックを使用して報告されます。
private ScanCallback mLeScanCallback = new ScanCallback() {
    @Override
    public void onScanResult(int callbackType, ScanResult result) {
        super.onScanResult(callbackType, result);

        BluetoothDevice device = result.getDevice();
        // デバイスのIDを取得. 必要に応じて対象デバイスの判定を行う。
        String address = device.getAddress()
        // スキャン結果をbyte配列で取得.
        ScanRecord scanRecord = result.getScanRecord();
        byte[] bytes = scanRecord.getBytes();
    }

    @Override
    public void onBatchScanResults(List<ScanResult> results) {
        super.onBatchScanResults(results);
    }

    @Override
    public void onScanFailed(int errorCode) {
        super.onScanFailed(errorCode);
    }
};
BLEスキャンの終了
BluetoothLeScanner.stopScan()でスキャンを停止します。スキャン開始時と同じコールバック関数を指定します。
final BluetoothLeScanner bluetoothLeScanner = mBluetoothAdapter.getBluetoothLeScanner();
bluetoothLeScanner.stopScan(mLeScanCallback);
スキャンしなくなる問題
BLEスキャンを指定していると、受信を行わなくなる場合があります。そのため、一定時間ごとにstartScan()を再コールします。
private Timer mBLELoopTimer;

mBLELoopTimer = new Timer(true);
mBLELoopTimer.schedule(new TimerTask() {
    @Override
    public void run() {
        final BluetoothLeScanner bluetoothLeScanner = mBluetoothAdapter.getBluetoothLeScanner();
        bluetoothLeScanner.stopScan(mLeScanCallback);
        bluetoothLeScanner.startScan(mLeScanCallback);
    }
}, 10, 600000); // 10msec後から10分毎に実施.
