Kurentoを使ってWebRTC MCUサーバーを作成する
Kurentoのデモを参考に、WebRTC MCUを構築していくためのメモです。
初期設定
作業フォルダを作成します。(今回はmcu-serverとしました)
mkdir mcu-server
cd mcu-server/
npm init
package.jsonの各項目は任意の値を入力してください。(特になければ全てエンターで進める)
次のコマンドを入力します。
npm install babel-polyfill
npm install babel-preset-es2015
npm install babel-preset-stage-3
npm install babel-register
npm install kurento-client
npm install express
npm install socket.io
kurento-group-call-node/ の mcu ブランチから以下をコピーします。
- .babelrc
- index.js
- server/
localhostのみで実行できるようにkurento-group-call-node/server/index.jsを次のように修正します。(★の部分)
const argv = minimst(process.argv.slice(2), {
    default: {
        as_uri: 'https://127.0.0.1:3000',
        ws_uri: 'ws://127.0.0.1:8888/kurento'   // ★自分のアドレスに変更する
    }
});
kurento-group-call-node/server/static/bower.jsonのdependencies > kurento-utilsを次のように変更します。
{
  "dependencies": {
    "kurento-utils": "master"
  }
}
次のコマンドを入力します。
cd server/static/
bower install
ここまででMCU機能の実行を行えます。ここから各ソースを読みながら変更を行います。
Kurento MCUの処理
ここでは、特に自分が覚えておきたい部分を記載しています。人によっては役に立たない内容かもしれません(^-^;
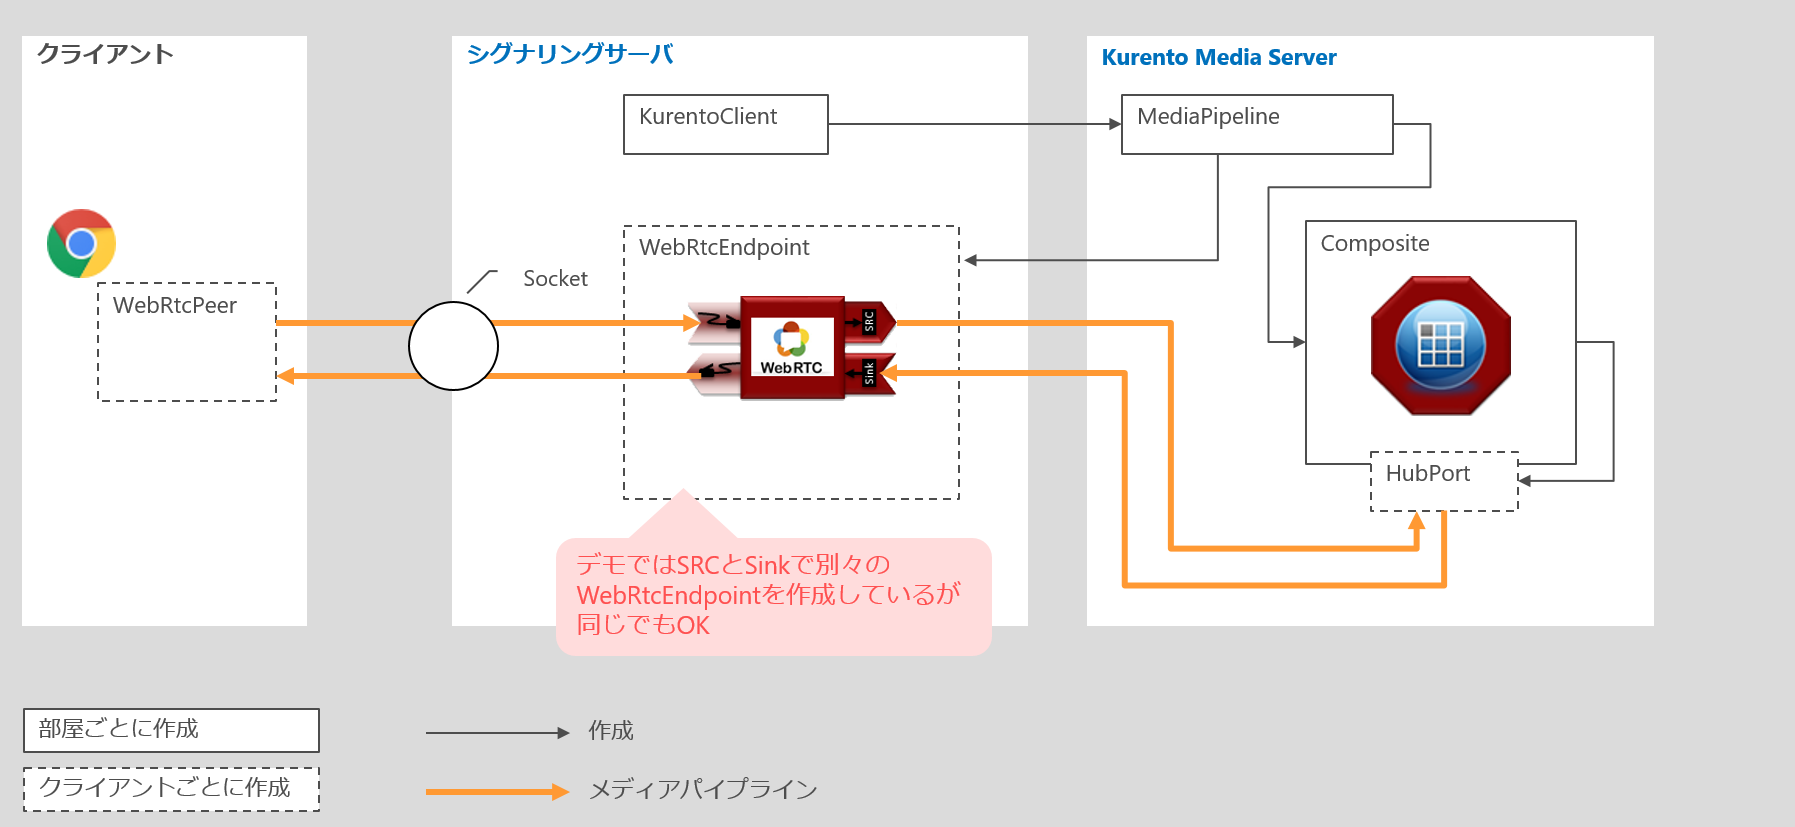
Kurento MCUの接続構成
各ファイルについて
| ファイル | 内容 |
|---|---|
| server/static/index.html | クライアント画面(enter room/video共通) |
| server/static/js/index.js | クライアント処理 |
| server/static/js/participant.js | クライアント処理 |
| server/index.js | サーバー処理 |
入室処理の流れ
- server/static/index.html >
Join!ボタン - server/static/js/index.js >
register() - server/index.js >
socket.on('message')>message.id = 'joinRoom'>joinRoom()>join()
接続処理
connect()でパイプラインを接続します。インスタンス(MediaElement)が入力になり、パラメータ(sink)が出力先になります。
MediaElement.connect(sink)
Kurento Media Server との接続を作成する
server/index.js > getRoom() > getKurentoClient()でKurento Media Server との接続(KurentoClient)を部屋ごとに作成します。
import kurento from 'kurento-client';
function getKurentoClient(callback) {
    kurento(wsUrl, (error, kurentoClient) => {
        if (error) {
            let message = `Could not find media server at address ${wsUrl}`;
            return callback(`${message} . Exiting with error ${error}`);
        }
        callback(null, kurentoClient);
    });
}
kurentoClientのコンストラクタ
callbackは(error, client)のパラメータを持ち、clientは作成されたKurentoClientインスタンスです。
kurentoClient(ws_uri, options, callback)
ドキュメント:Class: KurentoClient
各モジュールについて
| モジュール | 機能 | 生成元 |
|---|---|---|
| KurentoClient | Kurento Media Serverとの接続 | - |
| MediaPipeline | Kurento Media Server内の要素の作成や接続に使用 | KurentoClient |
| WebRtcEndpoint | KurentoWebRTCエンドポイントの制御インターフェース。ピアツーピアの入出力的なもの | MediaPipeline |
| Composite | 映像を合成して出力する | MediaPipeline |
| HubPort | 複数のエンドポイントを接続するハブを指定する | Composite |
各モジュールの作成手順
kurento(wsUrl)でKurentoClientを作成kurentoClient.create('MediaPipeline')でMediaPipelineを作成pipeline.create('Composite')でCompositeを作成pipeline.create('WebRtcEndpoint')でWebRtcEndpointを作成composite.createHubPort()でHubPortを作成
デモではSRCとSinkで別々のWebRtcEndpointを作成していますが、同じWebRtcEndpointでも動作します。
クライアントはWebRtcPeerで接続します。WebRtcPeerは
kurentoUtils.WebRtcPeer.WebRtcPeerSendonly()kurentoUtils.WebRtcPeer.WebRtcPeerSendrecv()
などで作成します。
参考
NODEで操るKURENTOメディアサーバー ( KURENTO + WEBRTC + NODE.JS )
slide p.63~