カスタムビュー(カスタムWidget)の作り方|Android開発
Androidでカスタムビューを作成し、レイアウトに追加する方法です。
カスタムビューの作成
レイアウトファイルの作成
res/layoutにカスタムビューのレイアウトファイルを追加し、見た目を定義します。
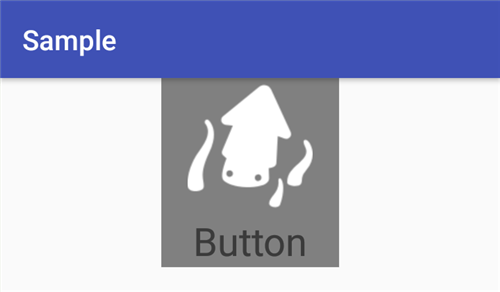
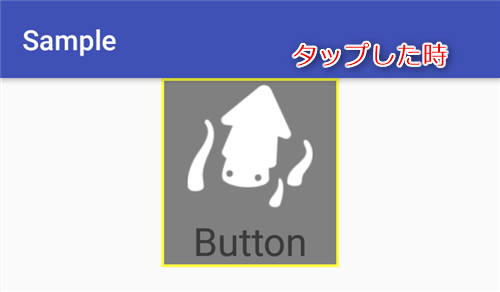
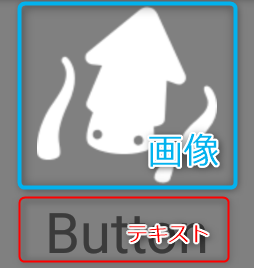
今回は以下のように画像とテキストが縦に並んだビューを定義します。
res/layout/image_text_button_widget_layout.xml
<?xml version="1.0" encoding="utf-8"?>
<merge xmlns:android="http://schemas.android.com/apk/res/android">
    <LinearLayout
        android:layout_width="wrap_content"
        android:layout_height="wrap_content"
        android:orientation="vertical"
        android:clickable="true"
        android:focusable="true"
        android:background="@drawable/layout_border_background"
        android:id="@+id/parent_panel">
        <ImageView
            android:layout_width="120dp"
            android:layout_height="90dp"
            android:layout_margin="4dp"
            android:id="@+id/image_view"/>
        <TextView
            android:layout_width="match_parent"
            android:layout_height="wrap_content"
            android:textSize="28sp"
            android:textAlignment="center"
            android:id="@+id/text_view"/>
    </LinearLayout>
</merge>
上記で使用している、背景などの定義ファイル。
res/drawable/layout_border_background.xml
<?xml version="1.0" encoding="utf-8"?>
<selector xmlns:android="http://schemas.android.com/apk/res/android">
    <item android:state_pressed="true">
        <shape>
            <solid android:color="#ff808080" />
            <stroke android:width="2dp" android:color="#ffffff40" />
        </shape>
    </item>
    <item android:state_pressed="false" android:state_focused="false">
        <shape>
            <solid android:color="#ff808080" />
            <stroke android:width="2dp" android:color="#ff808080" />
        </shape>
    </item>
    <item android:state_pressed="false" android:state_focused="true">
        <shape>
            <solid android:color="#ff808080" />
            <stroke android:width="2dp" android:color="#ffc0c040" />
        </shape>
    </item>
</selector>
カスタムビューの実装
ViewGroupを継承したクラスを作成します。(ここではレイアウトファイルのルートであるLinearLayoutを継承)
View.inflate()またはLayoutInflater.inflate()を使ってあらかじめ定義したレイアウトを指定することでビューの見た目を反映させます。
ImageTextButton.java
package com.moewenet.widget;

import android.content.Context;
import android.graphics.Bitmap;
import android.util.AttributeSet;
import android.util.Log;
import android.view.View;
import android.widget.ImageView;
import android.widget.LinearLayout;
import android.widget.TextView;

import org.apache.commons.lang3.StringUtils;

public class ImageTextButton extends LinearLayout implements View.OnClickListener {
    private static final String TAG = "ImageTextButton";

    public interface OnClickListener {
        void onClick(ImageTextButton widget);
    }

    protected static final OnClickListener NullListener = new OnClickListener() {
        @Override
        public void onClick(ImageTextButton widget) {
            // NOP
            Log.i(TAG, "onClick button.");
        }
    };

    protected OnClickListener mOnClickListener;

    protected String mKey;

    public ImageTextButton(Context context) {
        super(context);
        setLayout(context);
    }

    public ImageTextButton(Context context, AttributeSet attrs) {
        super(context, attrs);
        setLayout(context);
    }

    private void setLayout(Context context) {
        setOrientation(LinearLayout.VERTICAL);
        View.inflate(context, R.layout.image_text_button_widget_layout, this);

        LinearLayout layout = (LinearLayout)findViewById(R.id.parent_panel);
        layout.setOnClickListener(this);

        mOnClickListener = NullListener;
        mKey = StringUtils.EMPTY;
    }

    public ImageTextButton setImage(Bitmap bitmap) {
        ImageView imageView = (ImageView)findViewById(R.id.image_view);
        imageView.setImageBitmap(bitmap);
        return this;
    }

    public ImageTextButton setText(String text) {
        TextView textView = (TextView)findViewById(R.id.text_view);
        textView.setText(text);
        return this;
    }

    public ImageTextButton setKey(String key) {
        mKey = key == null ? StringUtils.EMPTY : key;
        return this;
    }

    public String getKey() {
        return mKey;
    }

    public void setOnClickListener(OnClickListener listener) {
        if (listener == null) {
            listener = NullListener;
        }
        mOnClickListener = listener;
    }

    @Override
    public void onClick(View view) {
        mOnClickListener.onClick(this);
    }
}
補足
View.inflate(context, R.layout.image_text_button_widget_layout, this);
の代わりに下記でも構いません。
LayoutInflater inflater = (LayoutInflater) context.getSystemService(Context.LAYOUT_INFLATER_SERVICE);
inflater.inflate(R.layout.image_text_button_widget_layout, this, true);
カスタムビューの使い方
ソースコードで指定する
ImageTextButtonクラスを生成して、LayoutにaddView()するだけです。
レイアウトファイル - res/layout/activity_main.xml
<?xml version="1.0" encoding="utf-8"?>
<LinearLayout
    xmlns:android="http://schemas.android.com/apk/res/android"
    xmlns:tools="http://schemas.android.com/tools"
    android:layout_width="match_parent"
    android:layout_height="match_parent"
    android:orientation="vertical"
    tools:context=".MainActivity">

    <LinearLayout
        android:id="@+id/top_linear_layout"
        android:layout_width="match_parent"
        android:layout_height="wrap_content"
        android:gravity="center_horizontal"
        android:orientation="horizontal">
    </LinearLayout>

</LinearLayout>
MainActivity.java
package com.moewenet.test;

import android.graphics.Bitmap;
import android.graphics.BitmapFactory;
import android.support.v7.app.AppCompatActivity;
import android.os.Bundle;
import android.util.Log;
import android.widget.LinearLayout;

import com.moewenet.widget.ImageTextButton;

public class MainActivity extends AppCompatActivity {
    private static final String TAG = "MainActivity";

    @Override
    protected void onCreate(Bundle savedInstanceState) {
        super.onCreate(savedInstanceState);
        setContentView(R.layout.activity_main);

        Bitmap bitmap = BitmapFactory.decodeResource(getResources(), R.drawable.squid);
        addButton("Button", bitmap);
    }

    private void addButton(String title, Bitmap bitmap) {
        LinearLayout layout = (LinearLayout)findViewById(R.id.top_linear_layout);
        ImageTextButton button = new ImageTextButton(this)
                .setText(title)
                .setKey(title)
                .setImage(bitmap);
        button.setOnClickListener(new ImageTextButton.OnClickListener() {
            @Override
            public void onClick(ImageTextButton widget) {
                Log.i(TAG, "OnClick from " + widget.getKey());
            }
        });
        layout.addView(button);
    }
}
レイアウトファイルで指定する
通常のViewと同じように指定可能です。
レイアウトファイル - res/layout/activity_main.xml
<?xml version="1.0" encoding="utf-8"?>
<LinearLayout
    xmlns:android="http://schemas.android.com/apk/res/android"
    xmlns:tools="http://schemas.android.com/tools"
    android:layout_width="match_parent"
    android:layout_height="match_parent"
    android:orientation="vertical"
    tools:context=".MainActivity">

    <LinearLayout
        android:id="@+id/top_linear_layout"
        android:layout_width="match_parent"
        android:layout_height="wrap_content"
        android:gravity="center_horizontal"
        android:orientation="horizontal">
        <com.moewenet.widget.ImageTextButton
            android:layout_width="wrap_content"
            android:layout_height="wrap_content"
            android:id="@+id/custom_button"/>
    </LinearLayout>

</LinearLayout>
MainActivity.java
package com.moewenet.test;

import android.graphics.Bitmap;
import android.graphics.BitmapFactory;
import android.support.v7.app.AppCompatActivity;
import android.os.Bundle;
import android.util.Log;
import android.widget.LinearLayout;

import com.moewenet.widget.ImageTextButton;

public class MainActivity extends AppCompatActivity {
    private static final String TAG = "MainActivity";

    @Override
    protected void onCreate(Bundle savedInstanceState) {
        super.onCreate(savedInstanceState);
        setContentView(R.layout.activity_main);

        Bitmap bitmap = BitmapFactory.decodeResource(getResources(), R.drawable.squid);

        ImageTextButton customButton = (ImageTextButton) findViewById(R.id.custom_button);
        customButton.setText("Button")
                .setKey("Button")
                .setImage(bitmap);
        customButton.setOnClickListener(new ImageTextButton.OnClickListener() {
            @Override
            public void onClick(ImageTextButton widget) {
                Log.i(TAG, "OnClick from " + widget.getKey());
            }
        });
    }
}
表示画面